This tutorial explains 3 methods how to add a datasource to the application server Wildfly from Redhat. If you don’t have Wildfly installed on your machine, you can follow my other posts:
Prerequisites
Even if these steps are driver-agnostic, the example will use MySQL Connector (in other words, the JDBC Driver for MySQL) and Wildfly 10.0.0-Final.
For the next steps, you will need:
- Wildfly installed and started
- MySQL, MariaDB, PostgreSQL or any datasource compatible with Wildfly
- The RDMS started and a database created (e.g. database: tutorial)
Notice that all these 3 methods have those steps in common:
- Add the JDBC Driver (a.k.a. Connector)
- Configure you datasource
Method 1: Add datasource via Admin-Console (the easy method)
1. Add the JDBC Driver
- Open the console from the browser (http://localhost:9990/console for a local server)

- Then in Deployments, to add to open the wizard
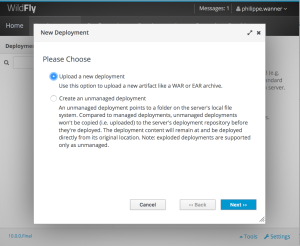
- After having clicked next, upload your Connector (i.e. JDBC Driver)
 Here is the MySQL page to download the driver: MySQL Connector URL
- After uploading it, you may want to change the connector name. My recommendation is to name your connector with the provider-name, type and the project’s name that will use it, since your application server my have some projects with different versions of the same connector provider.
 Note that the name is how the deployment is known to the users and must be unique. The runtime name is how is known to the server. This way you may have multiple names but refering to the same runtime name.
Do not forget to enable your new deployment! (It should be enabled by default) - Press finish to deploy your connector to your application server.
2. Configure you datasource
- Add a new datasource by clicking on ‘Start’ on the right of ‘Create a Datasource’. This will define a datasource to be used by deployed applications.

- Then select ‘Subsystems’ and ‘Datasources’ and either Non-XA or XA depending of your project type. This tutorial needs a Non-XA datasource. Then click ‘Add’.

- Then click ‘Add’, choose your datasource (MySQL Datasource for this tutorial) and click next.

- Give to the attributes name and a JNDI name to your datasource. The JNDI name is like a name in a directory service allowing your programs to discover the data and object. Both name and JNDI name have to be unique. Then click ‘next’.

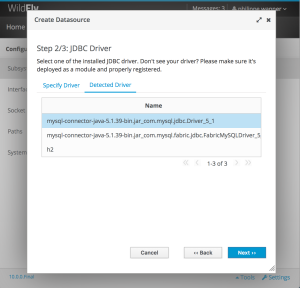
- Then select your JDBC Driver you have deployed before. To do that, click on ‘Detected Driver’ and select it and click ‘next’
- Then add the attributes you will need to connect to your RDMS server.

- On the next screen, you can easily test your connection. In case of failure, the details will guide you to the solution.

Pros / Cons
+ Easy to configure
+ No coding
– Need to use the management console, could be a security issue for a company
– Need to reboot your server to add a datasource.
Method 2: Add datasource via standalone.xml
The file that configures your server is named ‘standalone.xml’ and it is located in your wildfly installation directory under:
{WILDFLY_DIR}/standalone/configuration/standalone.xml
Important: The management console is updating the standalone.xml. Hence all we have done in method 1 is actually an abstraction of what we will do here.
1. Add the JDBC Driver
- With help of your window manager, go under
{WILDFLY_DIR}/modules/system/layers/base/ - Then create a subdirectory for your JDBC Driver representing the package structure of your Connector. So create the subfolder:
{WILDFLY_DIR}/modules/system/layers/base/com/mysql - Copy your JDBC Driver into the directory you have just created.
- Create a XML file in the directory named module.xml.
-
$ pwd
/usr/local/opt/wildfly-as
$ cd modules/system/layers/base/com/mysql/
$ touch module.xml
- Then copy this into the module.xml you created:
<?xml version="1.0" encoding="UTF-8"?> <module xmlns="urn:jboss:module:1.3" name="com.mysql"> <resources> <resource-root path="mysql-connector-java-5.1.39-bin.jar"/> </resources> <dependencies> <module name="javax.api"/> <module name="javax.transaction.api"/> </dependencies> </module> - Edit the standalone.xml file located:
{WILDFLY_DIR}/standalone/configuration/standalone.xml - Find the <drivers> element (after the <datasource> element). Then add this snippet:
<drivers>
 <driver name="mysql" module="com.mysql">
  <datasource-class>com.mysql.jdbc.Driver</datasource-class>
 </driver>
</drivers>
- That’s it, the driver has been added to Wildfly. Now let’s configure the datasource.
2. Configure you datasource
- Just above the driver snippet, add this datasoure snippet:
<datasource jta="true" jndi-name="java:/MySqlDS" pool-name="MySqlDS" enabled="true" use-ccm="true">
  <connection-url>jdbc:mysql://localhost:3306/mysqldb</connection-url>
  <driver>mysql</driver>
  <security>
    <user-name>root</user-name>
    <password></password>
  </security>
  <validation>
  <valid-connection-checker class-name="org.jboss.jca.adapters.jdbc.extensions.mysql.MySQLValidConnectionChecker"/>
  <background-validation>true</background-validation>
  <exception-sorter class-name="org.jboss.jca.adapters.jdbc.extensions.mysql.MySQLExceptionSorter"/>
  </validation>
 </datasource>
Make sure that the name of the driver (between the <driver> element are the name given to your driver). You can also configure the username, password and database name.
- Restart Wildfly and verify by checking the connection to the database through the mangement console:
Pros / Cons
+ Standanlone.xml file can be part of your deployment, which is handy.
– Critical if multiple application run on the same server.
– Need to reboot your server to add a datasource.
Method 3: Add datasource via CLI
CLI stands for Command Line Interface and is a command line management tool for JBoss Application Server. It allows a developer / operator to execute management operations and includes these features:
- connect to the specific controller or server instance;
- view the available managed components, their attributes and operations;
- deploy and undeploy standard packages at runtime in standalone and domain modes;
- …
The two main advantages of the CLI is:
- You can automate your interactation with Wildfly through a script.
- You can run this on a running Wildfly server.
The CLI is located at:
{WILDFLY_DIR}/bin/cli-client.sh
1. Add the JDBC Driver
- Start the command line interface with the following command:
./jboss-cli.sh --connect controller=127.0.0.1 - Then install the JDBC jar by loading it into a module.
module add --name=com.mysql --resources=~/Downloads/mysql-connector-java-5.1.39/mysql-connector-java-5.1.39-bin.jar --dependencies=javax.api,javax.transaction.apiImportant: pay attention to where to add a space, and where not to add a space, this is scripting 😉
2. Configure you datasource
- Add the driver to the data-sources subsystem.
/subsystem=datasources/jdbc-driver=mysql:add(driver-name="mysql",driver-module-name="com.mysql",driver-class-name=com.mysql.jdbc.Driver)It returns {“outcome” => “success”} in case of success.
- Create the datasource that uses the JDBC driver we just installed.
data-source add --jndi-name=java:/MySqlDS --name=MySqlPool --connection-url=jdbc:mysql://localhost:3306/mysqldb --driver-name=mysql --user-name=root - Test your connection and that’s it.
Pros / Cons
+ Best option from a dev-ops perspective. A script can be run before deploying an application and the script can be part of your deployment as well.
+ Plays very well with technologies like Docker.
+ Configuration can be changed at runtime! So no reboot required.
References
byteslounge: container vs application managed entity manager
mastertheboss: configuring a datasource with postgresql and wildfly
Thanks to
- David Kühner for the technical review

excellent explanation. thanks!
LikeLiked by 1 person
thanksssssssss
LikeLiked by 1 person
Thanks for the post. It has helped me a lot. Never realised an interesting way of adding a Driver. I wanted to work with version 6.0 of the Driver and have been trying in vain.
LikeLiked by 1 person
Thanks. Never realised the quick way of uploading the Driver.
LikeLiked by 1 person
Thank you so much 🙂 You saved my time.
LikeLiked by 1 person
Thanks for the tutorial. I have tried all 3 ways and always get same error: {“WFLYCTL0180: Services with missing/unavailable dependencies” => [“jboss.driver-demander.java:/MySqlDS is missing [jboss.jdbc-driver.mysql]”,”org.wildfly.data-source.MySqlPool is missing [jboss.jdbc-driver.mysql]”]}
Any help is appreciated
LikeLike
Hi David. There are many posts about this problem that occurs quite often. Can you tell me more about your XML file and configuration?
P.S: If you are on OpenShift, there is a current bug open that should be fixed soon.
LikeLike
This is a great tutorial however note that the mysql connector jar is not automatically recognised as a driver due to not obeying some rules – see “Note on MySQL driver and JDBC Type 4 compliance” here – https://developer.jboss.org/wiki/DataSourceConfigurationInAS7
This is causing the issue David Kenner is seeing above.
I added the META-INF/services/java.sql.Driver file to the jar as per instructions and now the tutorial above works perfectly.
LikeLiked by 1 person
Thank you for your input.
LikeLike
Fucking Awesome 🙂
LikeLiked by 1 person
hi Philippe
can you help me on this
[domain@192.168.125.6:9999 /] /profile=full-ha/subsystem=datasources/jdbc-driver=mysql:add(driver-name=mysql,driver-module-name=com.mysql.jdbc,driver-xa-datasource-class-name=com.mysql.jdbc.jdbc2.optional.MysqlXADataSource)
{
“outcome” => “failed”,
“result” => undefined,
“failure-description” => {“WFLYDC0074: Operation failed or was rolled back on all servers. Server failures:” => {“server-group” => {“car_rer-group” => {“host” => {
“web-1.test-lab.com” => {“web-1.test-lab.com” => “WFLYJCA0041: Failed to load module for driver [com.mysql.jdbc]”},
“web-2.test-lab.com” => {“web-2.test-lab.com” => “WFLYJCA0041: Failed to load module for driver [com.mysql.jdbc]”}
}}}}},
“rolled-back” => true,
“server-groups” => {“car_rer-group” => {“host” => {
“web-1.test-lab.com” => {“web-1.test-lab.com” => {“response” => {
“outcome” => “failed”,
“result” => undefined,
“failure-description” => “WFLYJCA0041: Failed to load module for driver [com.mysql.jdbc]”,
“rolled-back” => true
}}},
“web-2.test-lab.com” => {“web-2.test-lab.com” => {“response” => {
“outcome” => “failed”,
“result” => undefined,
“failure-description” => “WFLYJCA0041: Failed to load module for driver [com.mysql.jdbc]”,
“rolled-back” => true
}}}
}}}
}
LikeLike
many thanks
LikeLiked by 1 person
Hello, thanks for the article!
Could you please change:
1. ADD THE JDBC DRIVER
8. Find the element (after the element). Then is add this snippet:
com.mysql.jdbc.Driver on com.mysql.jdbc.Driver
Thanks!
LikeLike
closing tag datasource-class is incorrect
LikeLike
Thanks, corrected.
LikeLike
Then is add this snippet –> Then add this snippet
Thanks Kyrylo
LikeLike